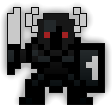
Oryx the Mad God 2, referred ingame as Oryx the Mad God (same as his previous incarnation), or colloquially as Oryx 2 or O2, is the boss of the Wine Cellar and considered the “final boss” of the game.
Stats[]
- Base HP: 65,000 (+20% [13000 HP] per player in Dungeon)
- DEF: 60
- EXP: 20000
- Location: Wine Cellar
- Immune to Stasis
- Level 1 Quest
- Counts to God Kills
- Counts to Oryx Kills
Combat[]
Attacks[]
Behavior[]
Phase 1[]
Initially, Oryx slowly wanders in the middle of the room, constantly firing his shotgun of status-inflicting stars and rings of fire bolts. He will also be spawning Henchman of Oryx at a frequent rate, and constantly throws yellow grenades that spawn Monstrosity Scarabs. Oryx can be pushed by approaching players.
His now-infamous shotgun consists of 3-round bursts of various stars fired at a constant rate. There appears to be no particular order in how the stars are fired, and the shotgun is aimed directly at the nearest player. Every now and then he adds a 3-round close-ranged burst of blade projectiles that inflict immense damage. Note that some of his stars are faster than others.
Phase 2[]
With around 30% HP remaining, he will taunt, “Can’t… keep… henchmen… alive… anymore! ARGHHH!!!”. All Henchmen die and Oryx stops spawning them. He then fires a circle of weakening and quieting stars that is impossible to dodge unless you back up far enough. Oryx will then begin to chase after players with his shotgun and fire bolts, and now fires a ring of weakening stars every few seconds (the quiet stars are only fired once at the beginning of his second phase.
Like the first Oryx, he will taunt every few moments to tell players his current HP.
Reproduction[]
| Spawns | |||||||
|---|---|---|---|---|---|---|---|

|
Henchman of Oryx
| ||||||
| Monstrosity Scarab | |||||||
Drops[]
Tips and Strategies[]
Oryx’s “shotgun” of stars is extremely dangerous, causing multiple status effects and very high damage. The blue confuse star moves faster than the other projectiles, so be careful to avoid it or risk being confused into the remainder of the projectiles.
Rogue Tips: Leave before you turn visible! If you are a rogue you should run next to Oryx, stay for about 3 seconds (assuming you have a cloak that is Twilight or up) then go back so that you don’t get shotgunned by Oryx. Getting slowed could mean that you are unable to get out of the range of Oryx’s shotgun when you uncloak.
Circling tips: Circle Oryx 2 clockwise if Oryx is directly in front of or behind your character. Circle Oryx 2 counter-clockwise if Oryx is to the left or right of your character. getting confused while circling in the wrong direction will send you charging into Oryx’s Shotgun. Remember that your “left” key will make you go “down” when confused, so press “left” to retreat (assuming Oryx is in front of you).
Assassin Tips: Assassins are considered the best class to use in a Wine Cellar, as their poisons are ideal for Oryx 2, who is vulnerable for quite some time, and doesn’t move around too fast until the second “chasing” phase. Use off-center screen to lob poisons and get tons of easy damage in.
Priest Tips: It is best to have a tiered wand in the first stages, as the tiered wands pierce through his minions and are able to reach Oryx with no problem. For the second stage however, it is best to use a Crystal Wand or Conducting wand; as they generally have higher damage.
Knight Tips: Try to dodge the status effect stars and run in and stun. Running in a straight line towards O2 won’t be a very good idea. Try to circle Inward to close the distance and stun. Make sure to have a lot of MP wine or MP potions so you can keep stunning! Make sure to run out BEFORE the stun wears out. But be careful, a missed stun can mean death! WARNING: When Oryx changes phases, he may become unstunned with a very high chance of instantly killing any nearby character, even 8/8 knights.
Wizard Tips: Sometimes Oryx will get pinned to a wall. You can go to the other side of the wall and shoot your spell. This is recommended when the wine cellar contains few people, and when most of the minions in the hallways of the cellar have been cleared out.
History[]
For Halloween 2016/2017, Oryx’s sprite was changed to the following:

Rarely, Oryx could also spawn wearing a witch hat:

For Christmas 2016, Oryx’s sprite was changed to the following:


